Juicing it up: testing best practices for Azure Bicep
Welcome, glad you’re here! Already back for more best practices for Azure Bicep? This is the second part in the best practices series on using Azure Bicep.

- Gijs ReijnCloud Engineer
In the first part of the blog series about Azure Bicep, you’ve touched on the following topics:
- Prepared your repository for teams to collaborate on
- Explored bootstrapping concepts to build up your local development environment
- Learned to create a test suite for rapid feedback before committing your code
- Sharing Bicep modules with your teams
- Automated the documentation process
In this second part, you are going to expand the testing suite on your Bicep code. Of course, that raises the question: why should you even bother testing your Bicep code? Glad you asked.
Why you should test your Infrastructure as Code
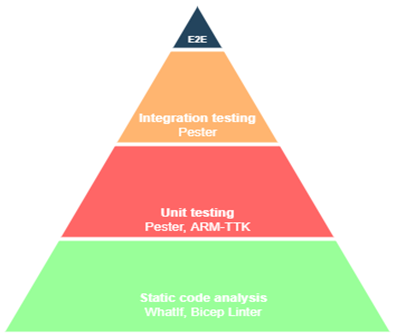
The need to test your Infrastructure as Code (also known as IaC) is quite obvious; Bicep is also code where you can apply testing patterns. Such patterns are shown in figure 1. In this figure you can see the testing pyramid for Infrastructure as Code.
It is quite common these days, when writing your Bicep code, you also write tests. The main benefits of testing your Bicep code:
- It helps improve the security
- It enhances the development process
- It ensures quality of code is working as expected
- It saves money overtime
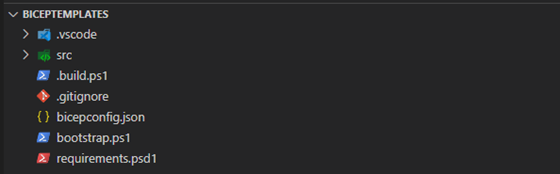
You have already seen in the first part that unit testing is covered in the ARM-TTK and static code analysis is being performed by the Bicep linter. In this part of the series you are going to expand the testing suite by checking for compliancy rules, implementing integration testing and preparing your structure for CI/CD systems to consume reporting. If you are following along with the series, you should already have your structure available as shown below:
Compliancy, should you even bother already?
To answer that question: yes, of course! There are many great tools and products available to test for compliancy. You can think about:
- Azure Policy
- Azure Tenant Security Solution
- Azure Advisor
- Security Center
These tools primarily target your environment after resources are deployed, based on the reporting they produce. It is useful to do scanning afterwards. But is it also possible to assess this process even before (pre-flight) you are deploying your resources to architect compliant resources for your team members?
That is where PSRule for Azure comes into play, which covers most of the uses cases that align with the Microsoft Azure Well-Architected framework (also known as WAF) early in a DevOps pipeline. Coming directly from the documentation.
The Azure Well-Architected Framework is a set of guiding tenets that can be used to improve the quality of a workload."
PSRule for Azure includes more than 280 rules that align with the WAF pillars. That means you can quickly fire up unit testing of your Azure resources before you even deploy a single resource. PSRule for Azure also supports adding your own organization rules. Let’s see that in action!
Setting up PSRule for Azure
To install PSRule for Azure, you will need two PowerShell modules. Luckily, you’ve already set up the bootstrapping concept, remember? Open the requirements.psd1 and add the following modules:
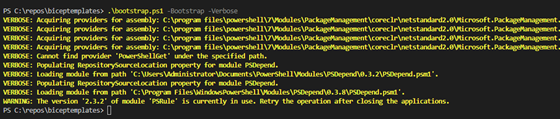
Now you can use the bootstrap.ps1 script to bootstrap the newly added PowerShell modules.
When you’ve finished installing the PowerShell modules, it is required to setup the configuration options for PSRule for Azure. PSRule for Azure comes with many configuration options and the engine that runs the rules will automatically find this file in the current working directory. You can find the options in the documentation. Let’s set up the basis for now by adding the ps-rule.yaml in the root of the working directory and add the following content:
Sweet! You’ve now set up PSRule for Azure. Let us continue with adding a new storage account resource into the project solution and test against that resource.
Adding the storage account resource
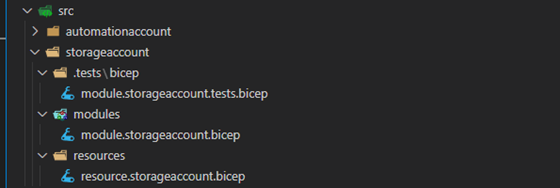
In the /src folder, you can add the new storage account resource. Because you already know the naming convention of each file, except the one for tests, you should be able to create the following files shown below in figure 4.
For running tests, you are specifically adding .tests in the name. This relative path can then easily be found by the build automation script, as you can see when adding the task just under the TestBicep task:
In the resource.storageaccount.bicep, you can add the following content:
The module.storageaccount.bicep uses the resource as shown below:
Finally, you can call the module to test in the module.storageaccount.tests.bicep file:
Let’s see that in action when running the build automation script with the Invoke-Build cmdlet shown in figure 5.
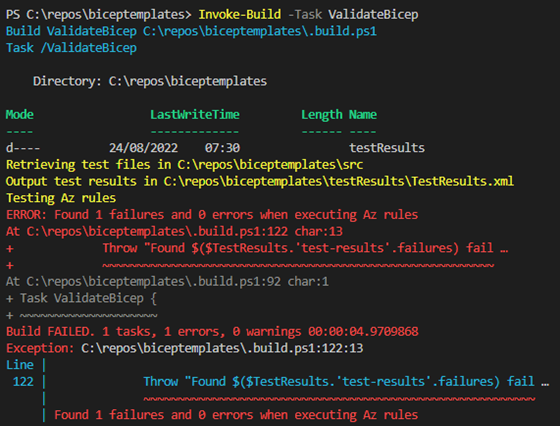
Oh no! It failed. Did you do that on purpose? Let’s see if you can fix that when analyzing the results.
Analyzing PSRule for Azure results
It might have gone a bit fast in previous sections, so let’s quickly recap what happened:
- A new task was introduced in the build automation script to validate Bicep test files with the PSRule for Azure
- Storage account resource was added
- Prepared the results of unit testing that can be consumed by CI/CD systems
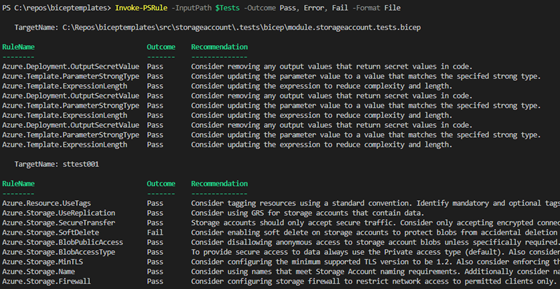
While the results are outputted in the testResults folder, it can be hard for the eye to read the NUnit report. If you have spotted it, you can see that all .tests.bicep are processes against the Invoke-PSRule cmdlet. If you want to analyze the results and get some familiarity in the raw output, it is possible to invoke it manually. You can run the following code in a PowerShell terminal to see which rules have been processed by the built-in rules from PSRule for Azure module.
The result can be seen in figure 6.
Looking into the documentation, you will see the recommendation and how you can configure it with Bicep. It is now possible to fix the issue by adding the code below in the resource.storageaccount.bicep file, as it needs a direct reference to Microsoft.Storage/storageAccounts.
Running the test once more to see if it is succeeding in figure 7.
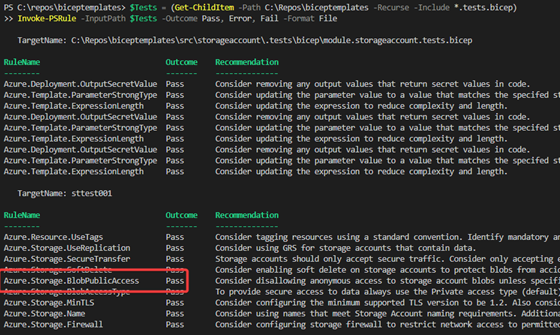
Good, you’ve verified that the test has now successfully passed!
Running integration test with Pester framework
You might have already heard of Pester when you are more advanced. If this is not the case, no worries; you are covered. Pester is the testing and mocking framework for PowerShell. Pester is commonly used for writing unit and integration tests in PowerShell. While most of the code that is written in the build automation script is PowerShell, you should easily grasp the concepts of Pester.
Pester comes as PowerShell module, meaning that you can add it to the requirements.psd1 file and let it install on your workstation and others.
You already have a whole setup of tests running now, so why should you run even an additional layer of tests? Even though it is more work to set up, you don’t have the option to validate the deployment directly, even with the Test-AzResourceGroupDeployment cmdlet. Your resource manager should have the correct specification. However, when deploying, it can be changed after post deployment. You need some proof if the templates that you’ve written are matching the specification that you want to implement.
Then when should you run integration test? Good question. A good rule of thumb is, if it takes 5 minutes to deploy the resource, you might lose patience. That’s why you let your integration test run during your Continuous Integration phase. Nevertheless, for your initial setup, you want to see how it is behaving. If you want to follow along, you’ll need a valid Azure subscription to deploy the storage account.
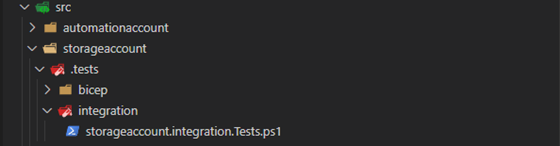
In figure 8 you can see that a new file is introduced called storageaccount.integration.Tests.ps1 under the integration folder.
The following code is added to create the environment, run the tests, and tear down the environment.
In the build.ps1 script you can add the PowerShell code to run the integration tests when you want. Keep in mind, you must be connected with Azure. Some resources even cost money, so be aware of that!
When you run the Invoke-Build cmdlet with the IntegrationTest task, you should get the results shown in figure 9.
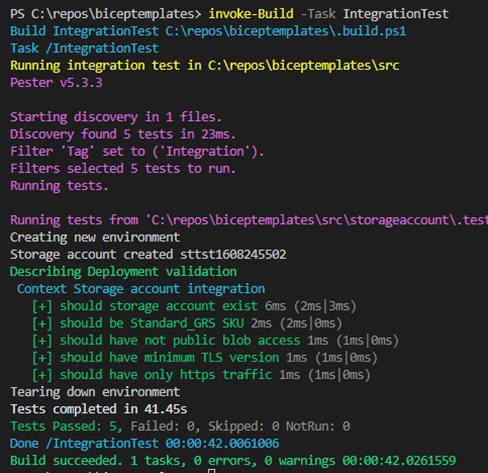
Phew! You are getting better and better at this. As you can see, it is still under the 5 minutes, but took way longer than other tests to run. For bigger implementation, this might take more time. Leveraging your CI/CD system would be beneficial to get the commits going!
Conclusion
Wow, that really was something, wasn’t it? You’ve gone through some advanced stuff if you followed along. You’ve got yourself an awesome test suite added to your structure. Compliancy is being tested with many built-in rules. Pester has been introduced, including integration tests, to validate the deployment. Reports are being generated that can be consumed by CI/CD systems. Are you up for a challenge? Can you think of more integration tests to run? Is it even possible for you to already add organization rules to the PSRule for Azure module? For sure, there are always enough challenges to solve! IT never rests.
Looking forward to seeing you next time in the third and final part of this series!