Ready, set, go! Covering up PowerShell module development
Finally, it’s been a while. In this last part of the series on PowerShell module development, you’re going to validate how many lines of code have been successfully tested by increasing the code coverage metric. Then, before publishing your module, you must make sure the changelog is up-to-date and you’ve included some release notes. Once you’re finished, you’ll be ready to publish the module to an internal package management tool, in this case Azure Artifacts, by including a custom task in the build automation script.

Before you start, let’s have a quick recap what you’ve done in the previous parts:
- You’ve created an awesome developer experience with VS Code
- You’ve created your first scaffolding module template called PoweringUp
- You’ve added rules to determine the quality of scripts that get introduced in the repository
- You’ve chosen your bracing style and included Pester tests to validate your scripts
If you’re ready to proceed, make sure that you have an organization in Azure DevOps available and have some prior knowledge on YAML-based pipelines, since you’re going to use it to create a pipeline and publish your module through Azure Pipelines. If you already have an organization and the knowledge at hand, then you’re ready to continue!
Covering it up with code coverage
Code coverage is a commonly known software testing metric that can help in assessing the test performance and quality aspects of your scripts. It’s good to know that code coverage can only be used for validating test cases and not for evaluating the script itself. Nor does it evaluate whether the source code is bug-free. Instead, some of the benefits of code coverage include:
- Easy maintenance of the code base itself
- Exposure of bad or unused code
- Decreasing the time to market
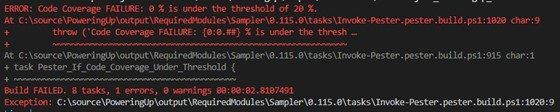
When you’ve already ran the build automation script itself, and you’ve noticed that the percentage that needs to be covered is 85%. For new codebases, this might be quite of a high value to start off with. For the purposes of this demo, you’re going to lower this value and introduce some test cases to increase the code coverage percentage. To lower the value of the code coverage threshold, you can follow the steps below.
- Open the build.yaml file
- Locate the CodeCoverageThreshold value under the Pester configuration
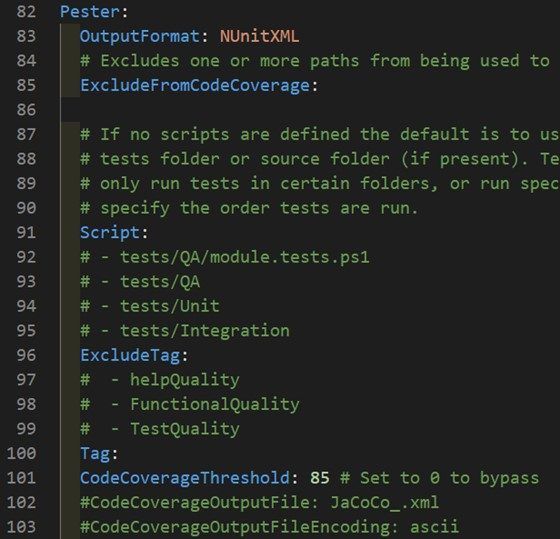
3. Set the value to 20 and save the file
If you’ve updated the build.yaml file, you can run the .\build.ps1 -Task test to see if the change has been applied.

You should already have two unit tests available for both the functions that were introduced to the repository. For the Get-PUPendingReboot and LogWrite function, you are going to introduce some test cases.
- Open the Get-PUPendingReboot.Tests.ps1 file
- Add the following content to test whether an empty result is returned when invalid computer name is specified
$here = Split-Path -Parent $MyInvocation.MyCommand.Path

# Convert-path required for PS7 or Join-Path fails
$ProjectPath = "$here\..\.." | Convert-Path
$ProjectName = (Get-ChildItem $ProjectPath\*\*.psd1 | Where-Object {
    ($_.Directory.Name -match 'source|src' -or $_.Directory.Name -eq $_.BaseName) -and
        $(try { Test-ModuleManifest $_.FullName -ErrorAction Stop }catch { $false }) }
).BaseName

$SourcePath = (Get-ChildItem $ProjectPath\*\*.psd1 | Where-Object {
        ($_.Directory.Name -match 'source|src' -or $_.Directory.Name -eq $_.BaseName) -and
        $(try { Test-ModuleManifest $_.FullName -ErrorAction Stop }catch { $false }) }
).Directory.FullName

$mut = Import-Module -Name $ProjectName -ErrorAction Stop -PassThru -Force

Describe "Get-PUPendingReboot Public Function" {
    Context "Get-PUPendingReboot unit tests" -Tag "Unit" {
        It "Should return empty" {
            Get-PUPendingReboot -ComputerName "notMyComputer" | Should -Be $null
        }
    }
}3. Save the file
4. Open the LogWrite.Tests.ps1 file
5. Add the following content to test the log levels and NoClobber parameter
BeforeAll {
    # Discovery private function
    $FunctionName = Split-Path $PSCommandPath.Replace('.Tests.ps1', '.ps1') -Leaf
    $PrivateFunction = Get-ChildItem $PSCommandPath\..\..\..\source\Private | Where-Object name -eq $FunctionName
    . $PrivateFunction.FullName
}

$LogLevels = @('Info', 'Warn', 'Error')

Describe "LogWrite <_> levels" -Tag "Unit" {
    BeforeAll {
        # Create item
        $LogPath = Join-Path (Split-Path $PSCommandPath -Parent) -ChildPath $FunctionName.Replace(".ps1", ".log")
        New-Item -Path (Split-Path $PSCommandPath -Parent) -Name $FunctionName.Replace(".ps1", ".log") -Force -ErrorAction SilentlyContinue

        $Message = "Performing unit testing"
    }
    Context "LogWrite <_> levels" -ForEach $LogLevels {
        It "Logwrite Level should work" {
            LogWrite -Level $_ -Message $Message -Path $LogPath -ErrorAction SilentlyContinue | Should -BeNullOrEmpty
        }
    }

    Context "LogWrite NoClobber test" {
        It "LogWrite should throw error when NoClobber is specified" {
            $RelativePath = LogWrite -Level "Info" -Message $Message -Path $LogPath -NoClobber -ErrorAction SilentlyContinue
            $Error[0].Exception.Message | Should -Be "Log file $LogPath already exists, and you specified NoClobber. Either delete the file or specify a different name."
        }
    }
    AfterAll {
        Remove-Item $LogPath
    }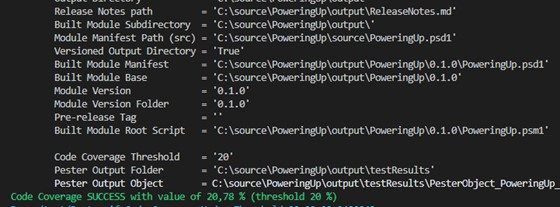
}When you run the test again, you’ll see that the percentage has increased.
Hey, was something changed recently?!
In the previous part, you saw that the CHANGELOG.md was dealt with. But why should you keep a changelog? The answer to that is quite simple: to make it easier for you and your contributors to see precisely what has been changed between each release over time. The changelog is common among open source communities and the format Sampler usages is based on a better changelog convention. So let’s update the changelog to introduce a change based on this format.
- Open the CHANGELOG.md
- Copy and paste the following content
# Changelog for PoweringUp

The format is based on and uses the types of changes according to [Keep a Changelog](https://keepachangelog.com/en/1.0.0/),
and this project adheres to [Semantic Versioning](https://semver.org/spec/v2.0.0.html).

## [0.0.1] - 2022-11-02

### Added

- Created a new Public function to get pending reboot status of computer(s)
- Created Private function to log the activities3. Save the file
Your contributors should now know what has been added to the module. You can introduce all kind of changes to the changelog types:
- Added: new features
- Changed: changes to existing functionality
- Deprecated: might be removed soon
- Removed: removed features
- Fixed: bug fixes
- Security: vulnerabilities
You can combine this together with the GitVersion tool to increase the build number when building through Azure Pipelines within the commit message itself.
PowerShell module pipeline
If you’ve worked with Azure DevOps, you can provide any file name for a pipeline, but the most commonly one is azure-pipelines.yml. That’s exactly what the Sampler module did: it created a boilerplate pipeline to start with that you can easily tweak to suit your own needs. If you’ve opened the file in the editor, you would have noticed that there are three stages:
- Build: uses the GitVersion.Tool to determine the version number and build script to pack the module in NuGet format
- Test: contains multiple jobs to perform tests on all platforms
- Deploy: deploys the module to PSGallery and creates a release on Github
It’s definitely nice that there is already a pre-configured pipeline, but if you have a sharp eye you know that it’s not applicable, as you want to keep that module internally. The other functions that are introduced in the repository are primarily targeted for Windows systems. Therefore, you’re going to start with re-branding the build and test stage. Later, you’ll add that custom task to publish internally.
- Open the azure-pipelines.yml file and remove all the content
- Add the following content to build and package the module
trigger:
  branches:
    include:
      - master
  paths:
    exclude:
      - CHANGELOG.md
  tags:
    include:
      - "v*"
    exclude:
      - "*-*"

variables:
  buildFolderName: output
  buildArtifactName: output
  testResultFolderName: testResults
  projectName: PoweringUp

stages:
  - stage: Build
    jobs:
      - job: Package_Module
        displayName: "Package Module"
        pool:
          vmImage: "ubuntu-latest"
        steps:
          - checkout: self
            fetchDepth: 0
          - pwsh: |
              dotnet tool install --global GitVersion.Tool
              dotnet-gitversion
              $gitVersionObject = dotnet-gitversion | ConvertFrom-Json
              $gitVersionObject.PSObject.Properties.ForEach{
                  Write-Host -Object "Setting Task Variable '$($_.Name)' with value '$($_.Value)'."
                  Write-Host -Object "##vso[task.setvariable variable=$($_.Name);]$($_.Value)"
              }
              Write-Host -Object "##vso[build.updatebuildnumber]$($gitVersionObject.FullSemVer)"
            displayName: Calculate ModuleVersion (GitVersion)

          - task: PowerShell@2
            name: package
            displayName: "Build & Package Module"
            inputs:
              filePath: "./build.ps1"
              arguments: "-ResolveDependency -tasks pack"
              pwsh: true
            env:
              ModuleVersion: $(NuGetVersionV2)

          - task: PublishPipelineArtifact@1
            displayName: "Publish Build Artifact"
            inputs:
              targetPath: "$(buildFolderName)/"
              artifact: $(buildArtifactName)
              publishLocation: "pipeline"
              parallel: true
3.	Add the test stage for both Windows PowerShell and PowerShell and save it
  - stage: Test
    dependsOn: Build
    jobs:
      - job: test_windows_core
        displayName: "Windows (PowerShell)"
        timeoutInMinutes: 0
        pool:
          vmImage: "windows-latest"
        steps:
          - checkout: self
            fetchDepth: 0
          - task: DownloadPipelineArtifact@2
            displayName: "Download Build Artifact"
            inputs:
              buildType: "current"
              artifactName: $(buildArtifactName)
              targetPath: "$(Build.SourcesDirectory)/$(buildFolderName)"

          - task: PowerShell@2
            name: test
            displayName: "Run Tests"
            inputs:
              filePath: "./build.ps1"
              arguments: "-tasks test"
              pwsh: true

          - task: PublishTestResults@2
            displayName: "Publish Test Results"
            condition: succeededOrFailed()
            inputs:
              testResultsFormat: "NUnit"
              testResultsFiles: "$(buildFolderName)/$(testResultFolderName)/NUnit*.xml"
              testRunTitle: "Windows (PowerShell)"

          - task: PublishPipelineArtifact@1
            displayName: "Publish Test Artifact"
            inputs:
              targetPath: "$(buildFolderName)/$(testResultFolderName)/"
              artifactName: "CodeCoverageWinPS7"
              parallel: true

      - job: test_windows_ps
        displayName: "Windows (Windows PowerShell)"
        timeoutInMinutes: 0
        pool:
          vmImage: "windows-latest"
        steps:
          - checkout: self
            fetchDepth: 0
          - task: DownloadPipelineArtifact@2
            displayName: "Download Build Artifact"
            inputs:
              buildType: "current"
              artifactName: $(buildArtifactName)
              targetPath: "$(Build.SourcesDirectory)/$(buildFolderName)"

          - task: PowerShell@2
            name: test
            displayName: "Run Tests"
            inputs:
              filePath: "./build.ps1"
              arguments: "-tasks test"
              pwsh: false

          - task: PublishTestResults@2
            displayName: "Publish Test Results"
            condition: succeededOrFailed()
            inputs:
              testResultsFormat: "NUnit"
              testResultsFiles: "$(buildFolderName)/$(testResultFolderName)/NUnit*.xml"
              testRunTitle: "Windows (Windows PowerShell)"

          - task: PublishPipelineArtifact@1
            displayName: "Publish Test Artifact"
            inputs:
              targetPath: "$(buildFolderName)/$(testResultFolderName)/"
              artifactName: "CodeCoverageWinPS51"
              parallel: true

      - job: Code_Coverage
        displayName: "Publish Code Coverage"
        dependsOn:
          - test_windows_core
          - test_windows_ps
        pool:
          vmImage: "ubuntu-latest"
        timeoutInMinutes: 0
        steps:
          - pwsh: |
              $repositoryOwner,$repositoryName = $env:BUILD_REPOSITORY_NAME -split '/'
              echo "##vso[task.setvariable variable=RepositoryOwner;isOutput=true]$repositoryOwner"
              echo "##vso[task.setvariable variable=RepositoryName;isOutput=true]$repositoryName"
            name: dscBuildVariable
            displayName: "Set Environment Variables"

          - task: DownloadPipelineArtifact@2
            displayName: "Download Pipeline Artifact"
            inputs:
              buildType: "current"
              artifactName: $(buildArtifactName)
              targetPath: "$(Build.SourcesDirectory)/$(buildArtifactName)"

          - task: DownloadPipelineArtifact@2
            displayName: "Download Test Artifact Windows (PS 5.1)"
            inputs:
              buildType: "current"
              artifactName: "CodeCoverageWinPS51"
              targetPath: "$(Build.SourcesDirectory)/$(buildFolderName)/$(testResultFolderName)"

          - task: DownloadPipelineArtifact@2
            displayName: "Download Test Artifact Windows (PS7)"
            inputs:
              buildType: "current"
              artifactName: "CodeCoverageWinPS7"
              targetPath: "$(Build.SourcesDirectory)/$(buildFolderName)/$(testResultFolderName)"

          # Make sure to update build.yaml to support these tasks, then uncomment these tasks:
          - task: PowerShell@2
            displayName: "Merge Code Coverage files"
            inputs:
              filePath: "./build.ps1"
              arguments: "-tasks merge"
              pwsh: true
          - task: PublishCodeCoverageResults@1
            displayName: "Publish Azure Code Coverage"
            inputs:
              codeCoverageTool: "JaCoCo"
              summaryFileLocation: "$(buildFolderName)/$(testResultFolderName)/CodeCov_Merged.xml"
pathToSources: "$(Build.SourcesDirectory)/$(buildArtifactName)/$(projectName)/$(Build.BuildNumber)/"Since you want the coverage report to be available in the reporting section of your pipeline, you need to modify the build.yaml to include this task as well.
3. Open the build.yaml file
4. Just underneath the test workflow, add the following two lines to enable the merging of coverage files and save the file
  merge:
- Merge_CodeCoverage_FilesSweet Caroline! That’s a bunch of YAML code for sure. Let’s import that big fellow into Azure Pipelines and see what happens.
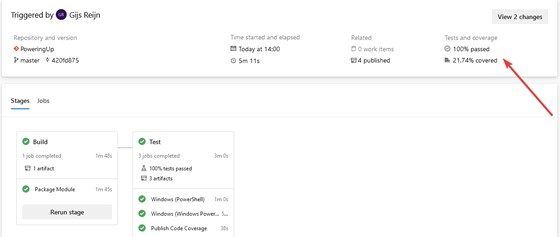
Your module is now building through Azure Pipelines and is finally ready to be published to your end users. You might have noticed that there is a small difference between the code coverage run locally, and the coverage through the Azure Pipelines. That’s because the reports gets combined from both Windows PowerShell and PowerShell.
Expanding build automation script with custom task
By now, you should have noticed that there are already several predefined tasks available from the Sampler module. Unfortunately, there isn’t a task available that publishes to the Azure Artifacts. Azure Artifacts is the package management tool that can host private NuGet packages, and that’s exactly what is being produced when you pack the module. Luckily, the build automation script that Sampler provides can be expanded quite easily.
If you’ve not modified the .build.ps1, you can find the following code from lines 265 to 270:
# Loading Build Tasks defined in the .build/ folder (will override the ones imported above if same task name).
Get-ChildItem -Path '.build/' -Recurse -Include '*.ps1' -ErrorAction Ignore |
ForEach-Object {
    "Importing file $($_.BaseName)" | Write-Verbose

    . $_.FullName
}This means if you create a .build folder inside your repository and add a file with .ps1 extension, it will try to load all these files with tasks inside it. This example shows how to:
- Create the .build folder in the root of your repository
- Create a new file called release.devops.module.build.ps1
- Add the following task that is responsible for publishing to the Azure Artifacts
param
(
# Base directory of all output (default to 'output')
[Parameter()]
[string]
$OutputDirectory = (property OutputDirectory (Join-Path $BuildRoot 'output')),
[Parameter()]
[string]
$ProjectName = (property ProjectName ''),
[Parameter()]
[System.String]
$ModuleVersion = (property ModuleVersion ''),
[Parameter()]
[string]
$PackageToken = (property PackageToken ''),
[Parameter()]
[string]
$ArtifactPublishSource = (property ArtifactPublishSource 'https://pkgs.dev.azure.com/<organization>/<projectName>/_packaging/PoweringUp/nuget/v2/'),
[Parameter()]
$ArtifactFeed = (property AritfactFeed 'AzureDevOpsSerivces'),
[Parameter()]
$SkipPublish = (property SkipPublish '')
)
# Synopsis: Upload Nuget package to Azure Artifacts
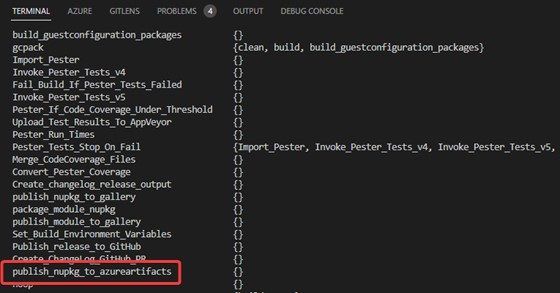
task publish_nupkg_to_azureartifacts -if ($PackageToken -and (Get-Command -Name 'nuget' -ErrorAction 'SilentlyContinue')) {
. Set-SamplerTaskVariable
# Force unregistering the nuget source
$null = &nuget sources remove -name $ArtifactFeed
# Register nuget source
$response = nuget sources add -Name $ArtifactFeed -Source $ArtifactPublishSource -username "AzureDevOpsModuleBuilder" -password $PackageToken
# find Module's nupkg
$PackageToRelease = Get-ChildItem -Path (Join-Path -Path $OutputDirectory -ChildPath "$ProjectName.$ModuleVersion.nupkg")
if (-not $SkipPublish) {
$response = &nuget push -Source $ArtifactFeed -ApiKey "AzureDevOpsApiKey" $PackageToRelease
}
Write-Build Green "Response = " + $response
$null = &nuget sources remove -name $ArtifactFeed
}In the code sample above, you’ll notice that the artifact name is called PoweringUp. You have to fill in your own organization and project names. Once you’ve filled it in, you can run the .\build -Task ? command, which reveals the task available to the task runner.
Now you can re-brand the last stage, and include this task instead of the Publish task itself.
- Open the azure-pipelines.yml file
- Add the following content to add the final stage
- stage: Deploy
    dependsOn: Test
    condition: |
      and(
        succeeded(),
        or(
          eq(variables['Build.SourceBranch'], 'refs/heads/master'),
          startsWith(variables['Build.SourceBranch'], 'refs/tags/')
        )
      )
    jobs:
      - job: Deploy_Module
        displayName: "Deploy Module"
        pool:
          vmImage: "ubuntu-latest"
        timeoutInMinutes: 5
        cancelTimeoutInMinutes: 5
        steps:
          - task: DownloadPipelineArtifact@2
            displayName: "Download Build Artifact"
            inputs:
              buildType: "current"
              artifactName: $(buildArtifactName)
              targetPath: "$(Build.SourcesDirectory)/$(buildFolderName)"
          - task: PowerShell@2
            name: publishRelease
            displayName: "Publish Release"
            inputs:
              filePath: "./build.ps1"
              arguments: "-tasks publish_nupkg_to_azureartifacts"
              pwsh: true
            env:
PackageToken: $(System.AccessToken)There is something interesting about the $(System.AccessToken) that is provided in the above sample. This is a security token that is dynamically generated by Azure Pipelines for each job at run time. The service identity for this PAT token is the “Project Collection Build Service (account)”. If you mention both timeoutInMinutes and cancelTimeoutInMinutes, you’re making sure that the PAT token lives between these times, making it more secure. This service identity must also have the AddPackage permission on your artifact feed. A quick look at the permissions table shows that the Contributor access can be used to give the least-privilege access.

Make sure that you add this permission before running the pipeline against the service identity !
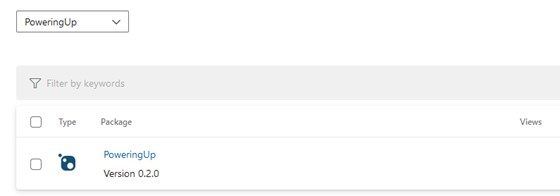
Once the permissions are set up, you can run the pipeline and notice that it has been successfully published.
Conclusion
This full series on PowerShell module development definitely covered a lot of content. The primary focus of the blog was mainly on module development, but you’ve probably noticed that there are a lot of things to take into account before publishing your module. Nevertheless, taking these small incremental steps provided you with the foundation for publishing a rich-module successfully that can now be used by your end users from Azure Artifacts. You’ve been able to increase the code coverage by introducing more tests in the suite and build up a proper changelog.
The resources section offers some helpful links to resources which you can read up on. Now it’s up to you to boost your module’s code coverage and increase it over time to keep that quality steady. Good luck!
Resources
- Generate semantic versioning | GitVersion
- Azure DevOps predefined variables | System access token
- Generate code coverage metrics PowerShell | Code Coverage Metrics
- Azure Artifacts feed permissions | Feed permissions
- Installing PowerShell module from feed | Connect to feed